Ethics in!

Brad has sent through final information for Stage 2 ethics clearance.  We included a skin biopsy protocol in case the fibroid cells are unviable. Unfortunately, when dealing with primary cells, nothing is certain and there is a possibility that the initial cells are contaminated or do not recover from the freezing process. As such, we have included ‘Plan B’ to ensure we can move forward with the project and establish a new batch of primary cells for immortalisation.

The ethics documents were formally submitted through the Ethics Review Manager. Hopefully, I have addressed all project aspects and provided sufficient information for approval.  Fingers crossed!

Lab Training

Today, I undertook my first day of hands-on lab training. To reduce workload for my kind hosts, I tagged along with 3rd year B/Med students. As part of a unit, they are doing a study into the effects of EGCG (Epigallocatechin Gallate) – an active ingredient in Green Tea which may have positive impacts on stroke patients.  For their study, they are testing the EGCG with HBVP pericyte cells.  The protocols covered today include: cell passage, cell counting and preparing 96-well plates with consistent cell numbers.

It was good to get back into the lab and go over the basics again.  Here is a short summary of the basic protocols involved in cell culture (with some additional insights from Jo-Maree in italics).

CELL SUSPENSION

  1. Put on gloves and ensure they cover the sleeve gap of the lab coat. [Gloves are required for working in the lab. Lab glasses are required for general lab areas but are not mandatory when working in a laminar flow cabinet as the glass offers protection].
  2. Turn on UV light in laminar flow hood (10 mins) to sterilise the interior working area. [Some hood have an automatic turn/off function that enables users to easily sterilise after use. Because these hoods are manual, group users tend to sterilise before use]
  3. Turn off UV and turn on light and blower to start the sterile airflow.
  4. Organise equipment, consumables and media (1 x fluid waste vessel, 1 x pipette waste vessel, pipette and pipette gun, pericyte media, PBS– and TrypLE . Spray all items (including gloved hands) with 70% Ethanol before placing in hood. [Do not place cells in front of waste vessels as this increases contamination due to laminar flow.  PBS– refers to phosphate buffered saline. The — is shorthand for PBS without Calcium (Ca2+) and magnesium (Mg2+) . These minerals help cells adhere to the surface of the culture flask. As such PBS — (without Ca2+ and Mg2+) is used when passaging cells (splitting them into additional flasks).  PBS++ (with Ca2+ and Mg2+) is used to promote cell adhesion. TrypLE is a form of trypsin (a digestive enzyme that detaches cells from adhering to the flask surface). TrypLE is milder and works well with HBVP cells.]
  5. Aliquot media from shared stock and place in heating bed. [The lab has a metal heating bed instead of a water bath. This is a new development and was implemented to reduce the likelihood of contamination as water baths (37 degrees, warm and moist) are perfect breeding grounds for bacteria and a known source of potential  contamination in cell culture).
    Metal Lab Beads for media heating‘Water bath’ using metal pellets to warm media to 37°C (body temperature) – very cool
  6. Collect cells from incubator and view under the microscope. Check cells for any contamination or odd changes in morphology.  [The HBVP cells used today were plated on Friday and are at passage 4 (P4) meaning that they have been split 4 times (although full passage numbers are not disclosed by cell suppliers). Today they were approx. 80% confluent (i.e. they have filled approx. 80% of the available space on the surface of the flask). It is important to not let cultures grow to 100%, as this impacts on cell growth and behaviour. Similarly, cells should be maintained at 30 – 40% min as too few cells also impairs growth. The lab also tends to use cells up to P8 or P9 only to ensure reliable results.]

    MicroscopeMicroscope connected to digital capture

    Cells observed under the light microscope
    Microscope view of cells displayed on the computer screen

  7.   Review cells for any contamination or odd changes in morphology.
  8. Spray flask with 70% ethanol and place into laminar flow hood.
  9. Remove nutrient medium [This can be poured off into the liquid waste vessel, if following correct technique.]
  10. Add 5mL PBS– to culture flask using 5mL pipette.
  11. Gently rotate the flask to wash the cells.
  12. Remove (pour off) PBS solution.
  13. Add 5mL TrypLE (trypsin) and place flask in incubator for 5 min.
  14. After 5 min, check that cells have detached.
  15. Add 10mL complete nutrient medium. [The nutrient medium contains fetal bovine serum FBS which neutralises the trypsin and stops cell digestion]. 
  16. Add cell solution to a 15mL tube.
  17. Spin cells in the centrifuge at 200G for 10 min (room temp). [It is important to add a counter balance when using the centrifuge.]
  18. Check that there is a small cell pellet in the base of the tube.
  19. Spray tube with 70% ethanol and return to laminar flow cabinet.
  20. Gently pour off liquid into the liquid waste vessel.
  21. Resuspend cells in 2mL complete nutrient medium.

CELL COUNTING

The cells are now ready for counting using a traditional haemocytometer – a glass slide with two chambers with a grid of 9 x 1mm squares used to count cells.

  1. Set up haemocytometer by adding the coverslip. [It helps to breath on the slip to create a good seal]
  2. Remove 20 μL of cell suspension.  Remove from hood. [You can place this on a piece of parafilm as it does not need to remain sterile.]
  3. Add 20 μL Trypan Blue to the 20 μL cells and pipette gently to mix the two solutions.  [Trypan Blue stains dead cells as the dye can penetrate through the dead cell membrane. This is used as a mechanism to help count viable cells only].  
  4. Add 10 μL to each chamber.
  5. Since HBVP cells are relatively large, count the cells in the large four corner squares. [When counting cells have a system to avoid doubling up on cells i.e. count top and right only of overlapping cells. Also check to make sure cells are evenly dispersed. If they are clumped together, you will need to suspend cells more thoroughly – i.e. mix with pipette]
  6. Add all cell counts from the corner squares together: 127 + 104 + 116 + 133 = 480 ÷ 4 (number of squares to get an average) = 120 x 104 x 2 (due to dilution with Trypan Blue) = 480 x 104. This is 4.8 x 106 (so 4.8 million cells in the 2mL suspension).
    Cell Counting
    Photo of Jo-Maree’s calculations
  7. To make it to 1x 10⁶ add 280μL to the 200μL.

The students set up 96 well plates with 100μL @ 5000 cells per well  as part their protocol.

CELL PASSAGE

  1. Add 1mL of the 1x 10⁶ cell suspension to a new flask.  Add 9mL fresh warm complete medium and gently rotate the flask to disperse cells.
  2. Remove cells from hood and place them in the incubator. [The cells will be confluent within 48 hours]. 
  3. Remove media, used pipettes and waste vessels from the hood.
  4. Place pipettes and pipette tips in biohazard bins. [If bins are full, take to dirty autoclave station and loosely secure bag with autoclave tape.]
  5. Add liquid waste to bleach to kill any remaining cells. [After 24 hours, all organisms are destroyed and the remaining liquid can be safely disposed of.]
  6. Place waste vessels in bleach bucket in sink area. [After 24 hours, these can be washed and left to dry for re-use].

ON A SIDE NOTE:

Poly-L-lysine is the correct coating to promote cell adhesion on glass surfaces. Jo-Maree has some in stock, so I am all set to work with my Petri dishes as part o the initial cell culture training.

Rhino Files

I have started preparing files in Rhino for laser engraving. This is a good Youtube introduction to setting up files with a some pointers for trimming and adding a hatch for engraving surfaces rather than just lines.

This is the start of my file prep in Rhino with dark areas signalling ‘hatched’ sections for surface engraving.

Screenshot of design in Rhino

Once the Petri dishes arrive, I can make time with the CAM technician Murray Antill to organise engraving. Of course, I need to test the settings first to ensure that I use the correct strength for lines vs. engraving. I usually use Perspex, so I will likely need to adapt the settings to suit a different material. The lines may also need further spacing as the laser produces around a .5mm line.

Immortalised cells – another work

As I continue to develop the project, I am looking into other artists working with cell immortalisation protocols.

A recent project involving the immortalisation of primary cells is the work Immortality for Two which forms part of a dual body of work collectively titled I’am by Luís Graça and Marta de Menezes. In contrast to the aims of the Billy Apple® project, this work reflects on the artist de Menezes and scientist Graça’s long-term working and romantic relationship (de Menezes M & Graça 2020).

Immortality for Two

Immortality for Two, Marta de Menezes 2014 – image available via Bioart Society

For more information see: https://martademenezes.com/portfolio/immortality-for-two/ 

de Menezes M & Graça L I’am – Immortality’s Anti-Marta, in Berger, E., Mäki-Reinikka, K., O’Reilly, K. and Sederholm, H., 2020. Art as we don’t know it. Aalto University School of Arts, Design and Architecture, pp. 52 – 53


Design prep

I purchased ten borosilicate glass Petri dishes last week in each size [1500mm and 900mm]. This will enable me to do the engraving and materials tests while I wait for ethics approval.

I am going to start with some simple designs that connect to motifs from my previous practice and signal notions of ongoing development and ‘rippling outwards’.  Screenshot of vector ripple design

Screenshot of vector ‘ripple’ design created in Adobe Illustrator.

This design was originally created for The Contamination of Alice #9 as part of the group show Ghost Biologies at Contemporary Art Tasmania in 2016. I feel that a similar pattern could work quite well engraved on the base of the Petri dishes. However, I will need to include some etched ‘shaded’ areas to see if scarring the surface helps with cell adhesion.

To create the new designs, I will try to work directly in Rhino – the software platform used for the laser cutter. Hopefully, this will enable me to create designs will fewer nodes to reduce clean up time and double lines.

Material supplies: Glass Petri Dishes

My primary lab contact is currently on leave so I am using the time to identify materials for experimentation. I am keen to grow and stain my cells on diverse materials (glass, porous and non-porous scaffolds etc). An easy start is to use glass Petri dishes with different coatings to encourage cell adherence. The use of coatings may also enable me to encourage cells to grow in particular patterns.

I’ve done a bit of searching via Researchgate and it seems that common surface coatings to encourage cell attachment to glass include:

  • Hyaluronic acid
  • Poly-D-Lysine – my current choice
  • Fetal Calf Serum
  • Bovine serum albumin
  • Gelatin
  • Fibronectin
  • Laminin
  • Collagen

I will ask for advice at the next lab meeting.

There were also suggestions to etch the glass surface with concentrated nitric acid and then wash and autoclave. At the UTAS School of Creative Arts and Media, we are fortunate to have access to a glass cutter and laser engraver. So instead of using acid, I will use the laser to score a design into the base of a large 150mm Petri dish.

Glass Petri Dish

Glass Petri dish by Lilly M via Wikimedia

Luckily Petri dishes are easy to purchase online. I just need to make sure the dishes are suitable for autoclave sterilisation (e.g.  borosilicate glass rather than soda lime glass).

Chameleon Pigments

While I plan to spend quite a bit of time in the lab, the Synapse residency is also giving me space to experiment with new creative materials that complement the focus of the research. In particular, I plan on moving forward with chameleon pigment experiments – I have been obsessed with them since the start of the year.

Chameleon pigments are essentially powered colours that have an iridescent quality reminiscent of peacock feathers and beetle wings.

Jewel Beetle

Example of iridescent Jewel Beetle, Jarrahdale State Forest, Western Australia, November 2011 by John Tann via Wikimedia Commons. 

What I particularly like about chameleon pigments is that they shift colour depending on the viewing angle. Not only can they shift between two colours (blue-green), some pigments allow for quite a large spectrum shift (blue-violet-red-orange).

My initial interest started with nail polish (even though I never wear it) as there are a fantastic range of chameleon and special effects options available on EBay and other outlets.

Screenshot E-Bay Search

Screenshot of Ebay search for chameleon nail polish July 2021.

While nail polish was a good start, the small volumes are unsuitable for larger projects. Therefore, my search took me to find larger volume options. I was delighted to discover that chameleon pigments are quite common in craft project and there are a number of retailers in Australia and overseas that produce chameleon and metal mica pigments for a wide range of applications.  The price of these products is variable, so I have been testing small quantities of powder from a range of companies including Solar Color Dust and A1 Pigments.

Screenshot of Chrome Dust Pigments

Screenshot of different chrome dust pigments available at SolarColorDust.com

With the Synapse grant, I plan to expand these initial experiments to include automotive products, as chameleon pigments are also available as for custom car painting and detailing in powder, paint and spray form. Perhaps they will even work to highlight fixed cells on glass.

Chameleon Car Paint

A car with chameleon pigment paint finish taken in 2019 by W Fan (cropped image with license plate number removed) via Wikimedia Commons.


First Artist Cell Line

Since the ultimate aims of my project involves the establishment of an artist cell line, it is important to acknowledge previous work in this terrain. Indeed, as briefly mentioned in my first post (project background), the first artist cell line was conceptualised in by artist-scientist Craig Hilton and involved the collaborative immortalisation of white blood cells (B-lymphocytes) from fellow artist Billy Apple®. The cells were transformed using the Epstein Barr virus and presented for exhibition in a bioreactor (sterile artificial environment that replicates the conditions inside a human body) with settings customised to Apple’s® own physiology (Hilton 2014).

The Immortalisation of Billy Apple

The Immortalisation of Billy Apple® at Starkwhite Gallery, Auckland, New Zealand, May 2010. (Hilton 2014)

While the project extended on Billy Apple’s® interest in artist branding, by allowing a branded component of the artist (Billy Apple® cells) to live on after his death, the project was also designed to enable the cells to be used for creative and scientific research projects. To facilitate this, the cells were destined for inclusion in the American Type Culture Collection (a central repository and distributions hub for cell lines). A 2014 press release by Starkwhite Gallery, archived via the Ocula Magazine, stated that the cells had been added to the ATCC collection. However, I recently had a look for the cells and could not locate them in the ATCC repository. I checked other biomedical supply companies but also with no success. This makes me curious to find out what happened to them. I plan on going to the source (i.e. Craig Hilton), but this will require further ethics clearance so that I can report his responses as part of my research. But first things first…cell culture clearance takes priority at this stage.

SIDE NOTE:

As a fan of the wonderful world of poo, it is also interesting to note that Billy Apple® was also the subject of a microbiome study in which stool samples of the artist taken 45 years apart were used to review changes in gut bacteria (Jayasinghe et. al. 2017).


Hilton, C., 2014. The immortalisation of Billy Apple®: an art-science collaboration. Leonardo47(2), pp.109-113.
Jayasinghe, T.N., Hilton, C., Tsai, P., Apple, B., Shepherd, P., Cutfield, W.S. and O’Sullivan, J.M., 2017. Long-term stability in the gut microbiome over 46 years in the life of Billy Apple®. Human Microbiome Journal5, pp.7-10.
Starkwhite Gallery, 2014, ‘Billy Apple and Craig Hilton:The Analysis of Billy Apple®’, Ocula Magazine, viewed 13 July 2021, https://ocula.com/art-galleries/starkwhite/exhibitions/the-analysis-of-billy-apple/

Training with HBVP [Human Brain Vascular Pericytes]

Despite UTAS improving the turn-around time for ethics clearance applications, it will take some time for the new application to be processed. Of course, we do not want to be idle, so the time pending formal approval will be used for project training.

While I have worked with cell and tissue culture previously as part of my PhD study at QUT, it has been over five years since I have actively worked in a lab environment. As such, it is important that I undertake training to ensure I am up to date with protocols and understand the working methods used at the UTAS School of Medicine.

To get up to speed, Brad and Jo-Maree suggested that I start working with HBVP Human Brain Vascular Pericyte cells.

HBVP Cells - via ScienCell

100 x phase contrast microscope image of HBVP cells via ScienCell.

These cells are a commercially available cell line and routinely used by the group for stroke research. The advantage of working with commercially available cell lines is that they have established protocols for optimum culture. As long as the research group is authorised to work with cell lines, they also do not require additional ethical clearance.

Culturing HBVP cells will not only enable me to brush up on cell culture techniques, they will also enable me to explore the behavioural characteristic of a different cell type. Indeed, Brad informed me that HBVP cells grow over microvessels and at later passage numbers, tend to form circular formations in culture.

whiteboard

Whiteboard drawing from meeting showing circular cell formation of HBVP cells and set ups for co-culturing cells via chamber inserts and microfluidics.

Brad and his group have been keen to work with 3D vascular scaffolds as part of their research, so the project and training stage provides an opportunity to work with some of Dietmar’s biofabricated tubes from the QUT Centre for Regenerative Medicine. After all, it is always better if training can also be productive!

Project Meeting

We had a detailed project planning and ethics clearance review meeting on Monday. It was heartening to hear that the ethics clearance documentation is almost ready for formal submission.

These are some of the processes we are expecting to undertake:

  • Cell culture of fibroid cells (optimisation of culture methods for 2D and 3D environments, cellular response and proliferation testing)
  • Co-culture of fibroid cells with other cell lines
  • Genetic profiling of primary fibroid cells
  • Immortalisation of primary fibroid cells via established commercial kit (e.g. Applied Biological Materials (ABM) cell immortalisation kits)
  • Reprogramming of primary cells to generate induced pluripotent stem cells (iPSCs) via established commercial kit (e.g. Epi5™ Episomal iPSC Reprogramming Kit available via Thermo Fisher)
  • Cell culture of reprogrammed or immortalised fibroid cells (optimisation of culture methods for 2D and 3D environments, cellular response and proliferation testing)
  • Genetic profiling of reprogrammed or immortalised fibroid cells and cells lines (if successful)
  • Fixing and staining of cells
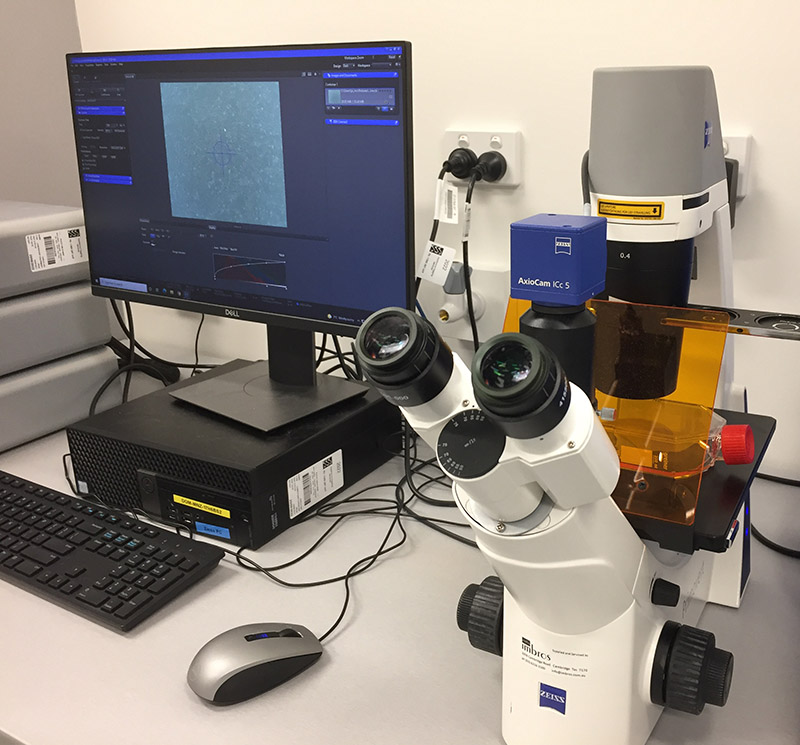
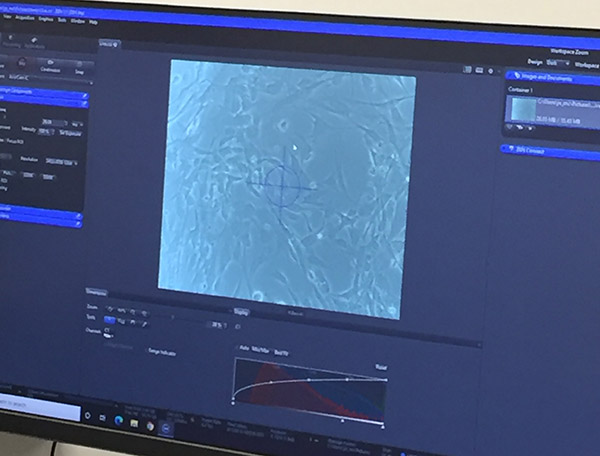
  • Light and confocal microscopy of cultured cells
  • Timelapse video of cultured cells

Other potential processes include:

  • Green Fluorescent Protein (GFP) cell tagging [UTAS]
  • Scanning Electron Microscopy (SEM) of cultured cells [UTAS]
  • Transmission Electron Microscopy (TEM) of cultured cells [UTAS]
  • Histopathology of cultured 3D structures [UTAS or QUT]
  • Development of Gastruloids, Organoids or Neurospheres (self-organised 3D cell masses) [UTAS]

I was delighted to hear that my desires for creating aggregates of cells via the production of gastruloids or organoids was not outside the domain of possibility. Jo-Maree has produced neurospheres (balls of neural stem cells) previously, so there may be scope (and hopefully time) to experiment with cell clusters.

Gastuloids are of particular interest to me as they are cell clusters that display features of early embryo development. Staining and fluorescence imaging (apart from being visually stunning) enables the visualisation of tissue organisation as shown in this figure and caption from the Nature publication ‘Multi-axial self-organization properties of mouse embryonic stem cells into gastruloids’:

Tissue organisation in gastruloids

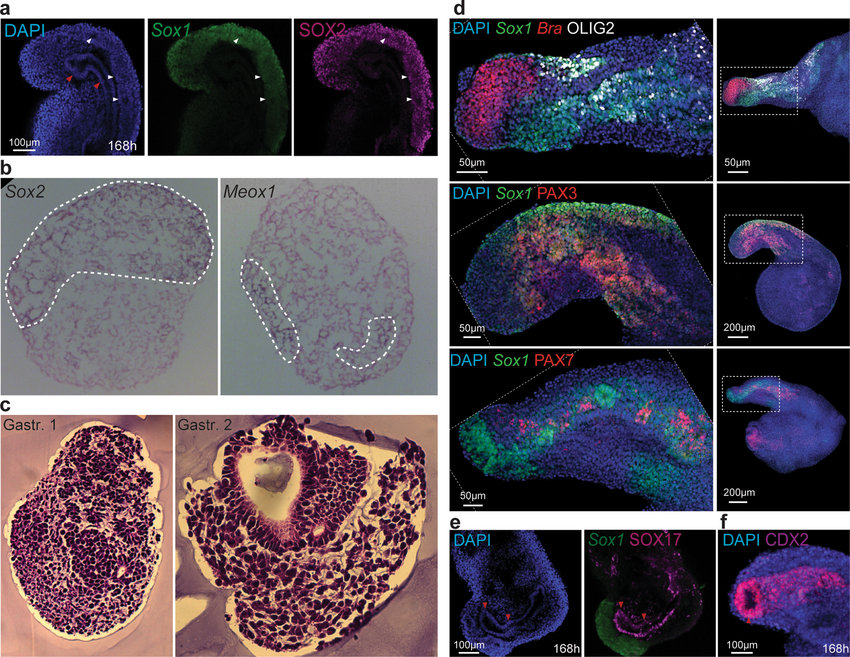
Tissue organization in gastruloids a, Gastruloids formed from Sox1GFP;BramCherry (SBR) line and stained for Sox2 expression (Sox1GFP and SOX2 signals are displayed in green and magenta, respectively). White arrowheads indicate tubular SOX2/Sox1-positive neural structures. Red arrowheads point to the presumptive digestive tube. b, WISH on 8-µm transverse cryosections of gastruloids at 144 h AA using Sox2 and Meox1 antisense probes, counter-stained with Nuclear Fast Red. Sox2-positive cells localized predominantly in a compact dorsal domain, whereas Meox1 signals were found in two bilateral domains. The domain of expression of each gene is outlined with white dashed lines. c, Haematoxylin and eosin staining of transverse paraffin sections of different gastruloids at 120 h AA, showing the diversity of cell types and several levels of tissue organization. d, Gastruloids formed from Sox1GFP;BramCherry ESCs were fixed and stained at 168 h AA for OLIG2 (top, white), PAX3 (middle, red) and PAX7 (bottom, red). Scale bars as indicated. c, d, Gastruloids formed from Sox1GFP; BramCherry ESCs collected at 168 h AA and stained for SOX17 (magenta, c) or CDX2 (magenta, d). Scale bars as indicated.

Gastruloids are created from embryonic stem cells, although iPSC cells (cells that have been reprogrammed into a stem cell like state) have also been used. As such, if I have success with reprogramming my fibroid cells to iPSC cells, I could use them to make, and learn more about, gastruloids.

During our discussion, we decided it would be a good idea to include an optional alternative to the fibroid cells – just in case there is an issue with contamination or the freezing/thawing process. While I have isolated skin cells (fibroblasts) from hair follicles and skin grafts previously as part of the HSE Project at QUT, we decided on skin scrapings.   This approach was selected as will enable the isolation of skin cells, is not too invasive and is well established within the School of Medicine.

Once I’ve included this information including the protocol, I should be ready to submit the final ethics clearance document.

Beccari, L., Moris, N., Girgin, M., Turner, D.A., Baillie-Johnson, P., Cossy, A.C., Lutolf, M.P., Duboule, D. and Arias, A.M., 2018. Multi-axial self-organization properties of mouse embryonic stem cells into gastruloids. Nature562(7726), pp.272-276.